What are saved responses?
Saved responses allow you to insert a predefined text into your text editor, while typing your message. Using saved responses will help you save time, especially with issues that require a standard response, while keeping your brand’s voice consistent.
Saved response may include images and attachments. In addition, you can use variables that will be replaced with the real data in real-time.
To use saved responses, you should first create the saved response and then choose to add it to your message while editing.
Create a saved response
The first thing you need to do is to create the saved response. The saved response can include variables, which will be replaced with real data when adding the text to your replies.
To create a new saved response:
In order to create a new saved response, you need to be a workspace administrator or a power user.
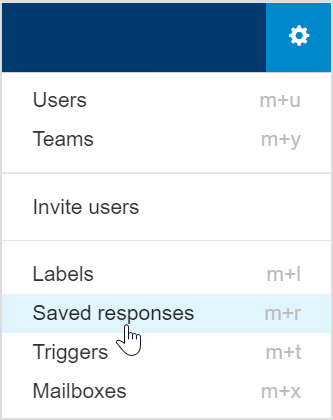
Click the Gear icon in the top-right corner and select Saved responses , or while editing a message, click the Insert Response button and select Manage Saved Responses.
Click the New Saved Response button.
Enter a clear and a specific name, so you will be able to easily understand what it contains. For example, you might want to name it “Server setup instructions for new users” rather than “Instructions”.
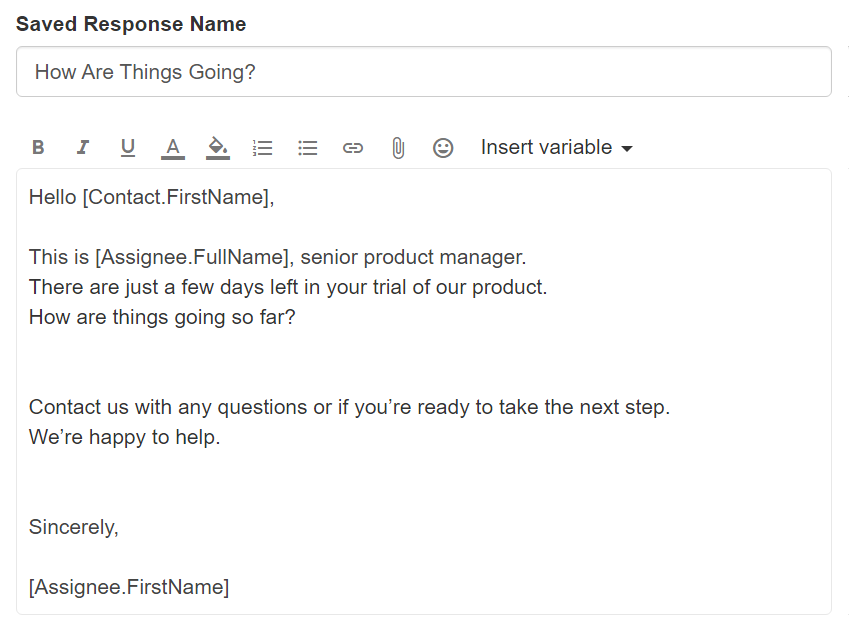
Type the text you want to have in the response. You can add inline images to the text which will be included in the message when choosing the saved response.
You can add attachments to the saved response, for example if you want to provide product literature/brochure to sales inquiries. The attachments will be added into the message when choosing the saved response.
You can add variables which are data fields that will be automatically replaced with real-time data when adding the response text to your message. See more details below.
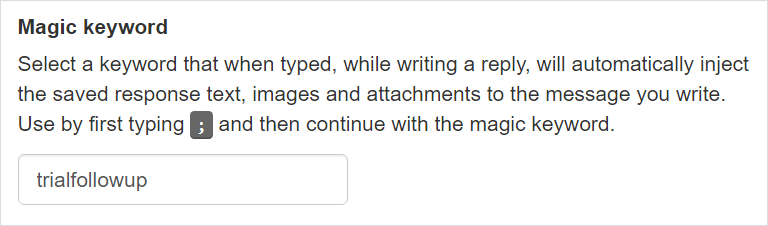
Provide a Magic keyword to help you easily find the saved response while typing a message. See more details about magic keywords below.
Set the availability. Options are to make this saved response available in all tickets or only for only for tickets of specific teams. See more details in Saved response availability below.
Click the Save & Close button.
Adding variables
While editing a saved response, you can use variables that will be automatically replaced with real-time data when adding the saved response text to your messages.
Variables can be selected from a list of available variables. The list contains fields associated with:
- Ticket assignee
- Ticket contact
- Current user editing the message
- Ticket account
- Ticket number
- Ticket subject
- Ticket team
- Workspace name
For example, you can add the customer’s name to the message using Contact – First name. The field anchor will be added to the saved response template, and when adding the text to your message, it will be replaced with the contact’s first name in real time.
The saved response may contain the following variable:
Hi [Contact.FirstName], Thank you for your email. …
When the saved response is inserted into a message, the variable is replaced with the appropriate value. For example, if the selected contact is Anna:
Hi Anna, Thank you for your email. …
What’s the magic keyword?
The magic keyword is a helpful shortcut to help you find and add your saved response easily to your message, while typing the text.
How does it work?
While creating a new saved response, you should provide a magic keyword that will help you easily find the specific response when you want to add it to your message. The name should be unique and easy to remember. For example: “standard” for your standard replies or start with “vip” for vip replies and so on.
While typing your message, if you want to find the reply easily, first type the ; sign (semicolon), and then continue with the magic keyword of the response you want to add. For example: type ;standard – this will popup the saved responses list and will find your response according to the word you type.
Saved response availability
The saved response availability option determines in which tickets you can use this saved response.
Options are:
- Make available in all tickets (default).
- Make available only in tickets of specific team.
By default, the saved response will be available for all tickets.
You can make the saved responses available for only tickets of specific teams, helping you to organize them better and to see fewer saved responses in the list when adding a saved response to a message.
To set teams to the saved response availability:
Scroll down to the Availability in Tickets section.
Click Change.
Select the option Only tickets of specific teams.
Select the teams of tickets this saved response is relevant for.
Click OK to save your changes.
Adding a saved response to a message
When you type a reply or start a new ticket, you can use the saved responses to add predefined text to your message:
When creating a new ticket, make sure to first select the contact details (so that if you have contact variables in the saved response, they can be used properly), and then start editing your message text.
When editing the ticket text or a reply, you can insert the saved response to the text in two ways:
Type ; (semicolon) and then the magic keyword you entered for the response and select the saved response from the pop-up list.
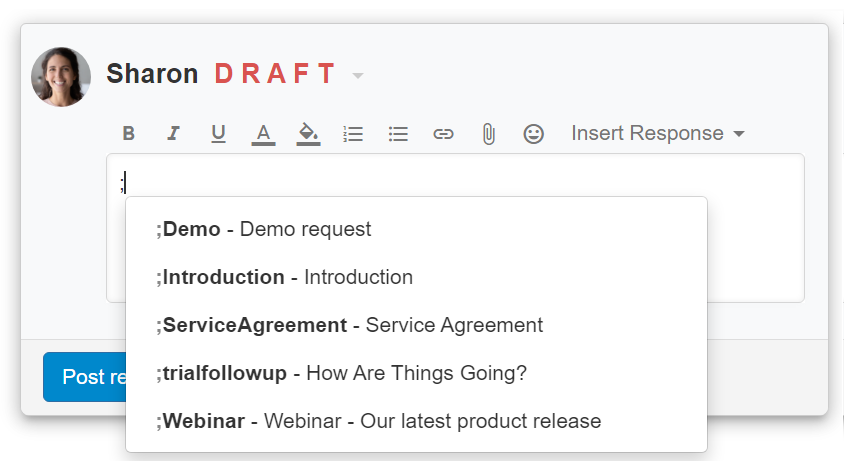
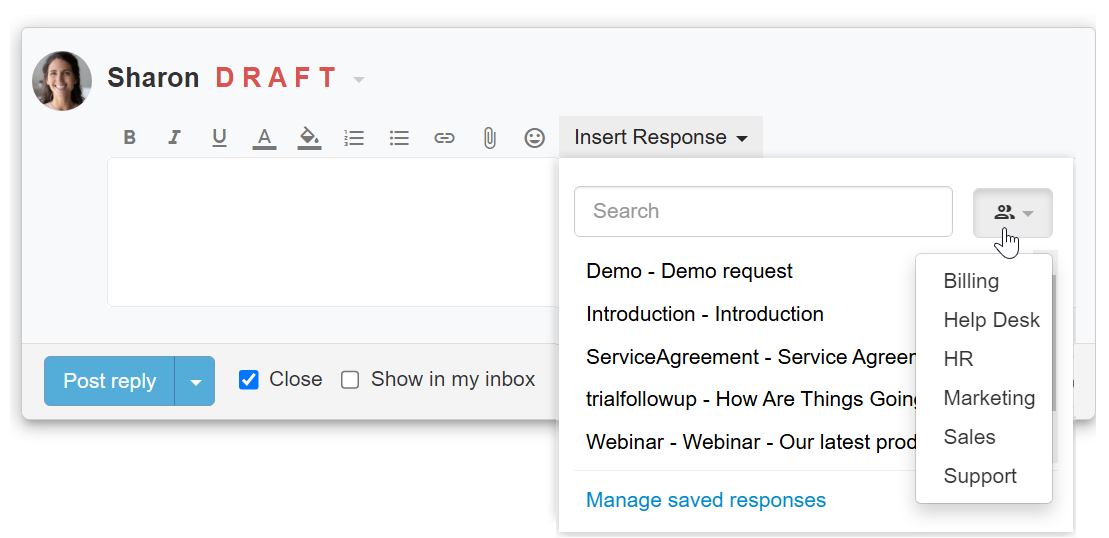
Click the Insert Response pull-down menu at the top of the editing area, and select the saved response from the list.
Select a team to display all saved responses associated with it.
The response text will be added to the editing area, and the variables you chose in the saved response will be replaced with the real data.
Continue editing the message as usual.
Managing saved responses
In order to manage saved response, such as create, update or delete a response, you need to be a workspace administrator or a power user.
Click the Gear icon in the top-right corner and select Saved responses , or while editing a response, click the Insert Response button and select Manage Saved Responses.
Actions you can perform:
Create new saved response – see above.
Edit saved response – Click the saved response you want to edit to open the details. You can edit the name, text, and magic keyword. Click Save & Close when done.
Delete saved response – You can delete a saved response either from the list (select the response you want to delete using the checkbox) or from the saved response details. Select the More menu then Delete or use the # keyboard shortcut.