What are labels?
In Replypad, labels are a simple way to add context and organize tickets better. Team members can assign multiple labels to each ticket. Each label has a name and a color and are accessible from the toolbar, displayed with a label-shaped icon.
Important things to know about Labels in Replypad:
Only users with admin or power users privileges can manage labels in the workspace.
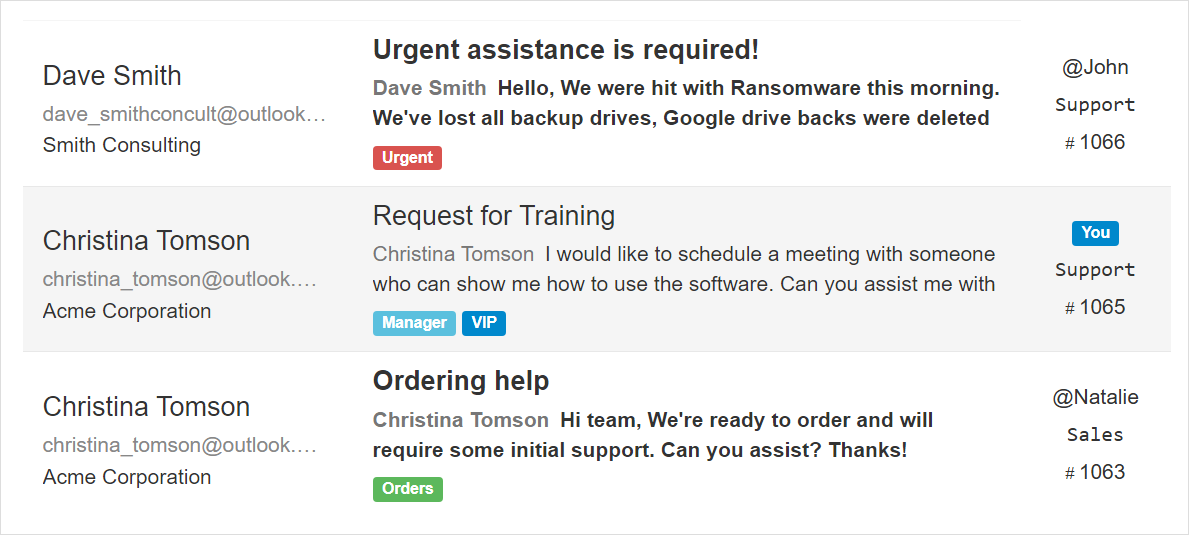
Labels can be used for various use-cases, for example, you may want to use labels to set all tickets of certain customers as ‘VIP’, or assign tickets that require user upgrade with the label ‘Upgrade’.
You can assign Labels to tickets manually or automatically (using triggers – see more details below.)
You can easily search for tickets by labels.
Create label
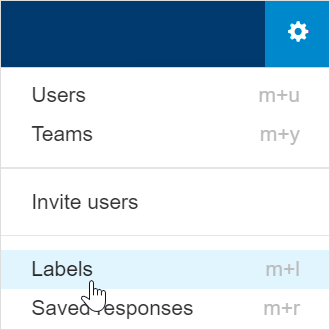
- Click the Gear icon on the top-right corner and Choose Labels from the popup menu.
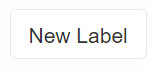
- Click the New Label button
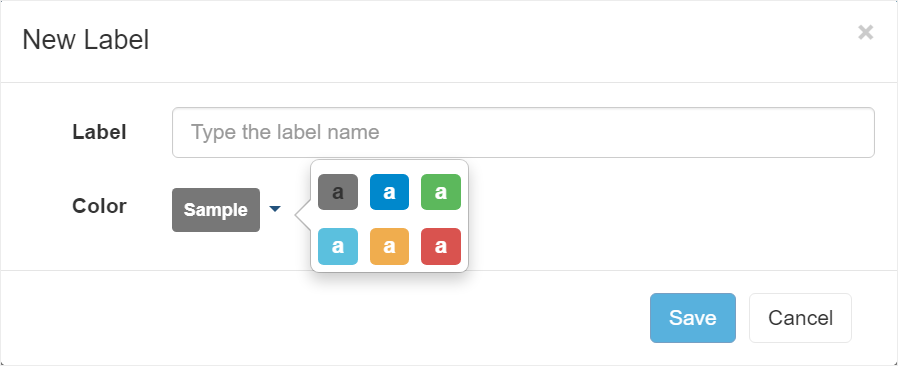
- Enter the label name. Choose a short yet meaningful name that represents the usage well, e.g. ‘VIP’,
- Choose the Color for the label.
- Click Save.
- The new label should now appear in the list.
Delete label
- Click the Gear icon on the top-right corner and choose Labels.
- Select the label you want to delete and from the More menu choose Delete (or hit # in the keyboard for a shortcut).
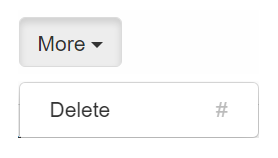
- In the window that appears, click OK to delete.
- The Label should no longer appear in the list.
Labels can be used in triggers to automatically set a label to tickets. Only Admin users can delete the label if it is being used in a trigger, because this will automatically deactivate the trigger and requires special attention.
Rename label
- Click the Gear icon on the top-right corner and Choose Labels from the popup menu.
- Click the label you want to rename.
- In the window that appears, edit the name in the Label edit box.
- Click Save to save your changes.
Change label color
- Click the Gear icon on the top-right corner and Choose Labels from the popup menu.
- Click the label you want to rename.
- In the window that appears, choose the Color.
- Click Save to save your changes.
Set default labels
Default label means that when the contact, account or user is selected as the To-contact of this ticket, the label will be applied to the ticket automatically.
See below how to set the default labels according to the role this person has.
Default labels by users
- Click the Gear icon on the top-right corner and choose Users.
- Click the user you want to assign the label to.
- Scroll down to the Default Labels area.
- Click Select to choose a label.
- You should now see the labels listed under the default labels.
- The labels selected will be automatically applied to tickets, when this user is selected as the To recipient of the ticket.

Default labels by contacts
- Click the Gear icon on the top-right corner and choose Contacts.
- Click the contact you want to assign the label to.
- In the contact’s details, scroll down to the Default Labels area.
- Click Select to choose a label. Select the label you want to use and click Save.
- You should now see the labels listed under the default labels.
- The labels selected will be automatically applied to tickets, when this Contact is selected as the To recipient of the ticket.

Default labels by accounts
- Click the Gear icon on the top-right corner and choose Accounts.
- Click the account you want to assign the label to.
- In the account’s details, scroll down to the Default Labels area.
- Click Select to choose a label. Select the label you want to use and click Save.
- You should now see the labels listed under the default labels.
- The labels selected will be automatically applied to tickets, when this account is selected as an account of a ticket.

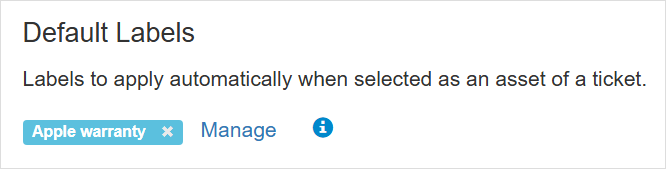
Default labels by assets
- Click the Gear icon on the top-right corner and choose Assets.
- Click the asset you want to assign the label to.
- In the asset’s details, scroll down to the Default Labels area.
- Click Select to choose a label. Select the label you want to use and click Save.
- You should now see the labels listed under the default labels.
- The labels selected will be automatically applied to tickets, when this asset is selected as an asset of a ticket.
Assign label using triggers
Triggers are a set of user defined rules that help you automate your work.You can use triggers to automatically assign a label to a ticket when the condition you define is met. For example, if a ticket is created for a specific account, then assign a specific label to it.
See Assign label using triggers for a detailed usage example.
If you are new to triggers, we recommend on reading understanding triggers first.