Importing assets
The import feature allows you to quickly import assets into your workspace from a CSV (Comma Separated Values) text file, without the need to manually add them one by one.
Prepare the CSV file for import
To import your assets you should prepare a CSV text file that stores the assets you want to import. CSV stands for Comma Separated Values, and it is a plain text file. Each line in the file represents an asset record which consists of one or more data fields, separated by commas. The first row in the file is the fields heading or names, and all of the other rows contain actual asset fields data or values, i.e., the assets data to import.
When preparing the file, verify field headings and naming conventions are accurate, as they are critical for a successful import. During the import the header name is matched with the parallel data field of an asset record in your workspace.
The file may only include header names with the exact names of fields listed below.
Your CSV file does not need to include all fields/headers, and fields can be arranged in any order.
Supported header field names:
- Asset Name
- Account Name
- Contact
- Type
- Warranty Expiration Date
- Purchase Date
- Installation Date
- Location
- Serial Number
- Model
- Description
- Notes
Important:
The Asset name field is mandatory and must appear in the file in order to identify the asset.
Maximum length: 100 characters. If the imported value exceeds this limit, it will be truncated to 100 characters.
Description field – maximum length: 4,000 characters. If the imported value exceeds this limit, it will be truncated to 4,000 characters.
You can include all data fields or only a few for example, you can include only Asset Name, Account and Warranty Expiration Date.
Not all fields of all assets need to have values – you can simply leave a field data empty in the file (it will show a comma in the CSV).
The daily import limit is 15,000 assets per day. This also represents the lines limit per file.
The file size must not exceed 3MB.
Example
Below is an example of a CSV file that can be imported:
Asset Name,Account Name,Contact,Type,Warranty / Expiration Date
Dell laptop,Acme Company,,Laptop,12/31/2028
Ipad ,Acme Company,Cindy,Laptop,03/31/2028
Who can import?
Workspace administrator and power users that have access rights to assets.
Importing your assets
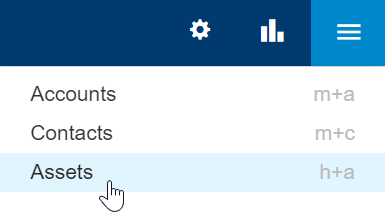
- Click the Three-lined (‘Hamburger’) icon and select Assets to open the assets list.
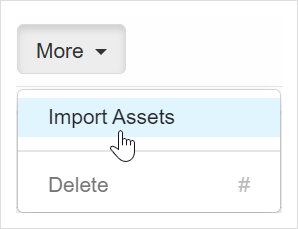
- Click the More menu in the assets toolbar and choose Import Assets to open the import window.
- Click Browse to select the file .csv file you want to import. If the file is found and loaded, you’ll see a confirmation in green text.
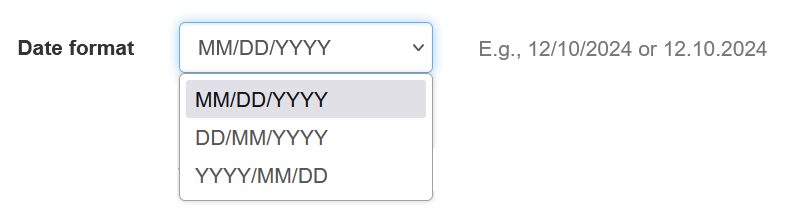
- Select the format you used in the file to import for dates, this will verify the import correctly sets the date:
- Click Import to start importing your file.
- Once the email message is received, you should revisit the assets list to see the updates.
Troubleshooting
Once the import is complete, an email message is received with an import report. In cases where not all assets have been imported, the message will include an explanation of the reason why the specific asset was skipped. Below is a list of messages you might see in the report.
If you encounter a failure to import a row, please check the following:
Message: Asset Name’ column not present in the CSV file.
How to fix: Make sure your names of fields specified in the first header line includes Asset Name because this is a mandatory field for assets and must be included in the import file.
Message: File type not in CSV format.
How to fix: Make sure you have the first row with field names, comma delimited, and that all the required fields are included in the columns headings.
Message: Maximum rows 15,000.
How to fix: The maximum for import is 15,000 rows per file (not including the header). You can always split large .csv files into smaller ones. You can also contact us to increase your daily import limits.