Importing contacts in Replypad
The import feature allows you to quickly import a contacts into Replypad using a CSV (Comma Separated Values) file, without the need to manually add them one by one.Contacts can be imported from Google or Outlook by first exporting from them to a .csv file and then importing to Replypad. You can also prepare a custom .csv file containing your contacts details, and import them as contacts.
This article talks about importing contacts. Accounts, which represent organizations or businesses in your Replypad workspace, can also be imported using a custom CSV file. See Import accounts for additional information.
Prepare the CSV file for import
To prepare your CSV file you have three options:- Export contacts from Outlook.
- Export contacts from Google.
- Prepare your own custom CSV file.
Option 1: Prepare CSV file from Outlook
To export your contacts from Outlook to a CSV file that can then be imported to Replypad, check out Microsoft’s support page on exporting contacts.Option 2: Prepare CSV file from Google
To export your contacts from Google Contacts to a CSV file that can then be imported to Replypad, check out Google’s support page on exporting contacts.Option 3: Prepare custom CSV file
If you want to import your contacts from a source other than Google or Outlook, you should prepare all the contacts in a custom CSV file. CSV stands for Comma Separated Values, and it is a plain text file. Each row of the file is a contact record which consists of one or more fields, separated by commas. The first row in the file is the fields heading or names, and the other rows contain the fields data or values, i.e., the contacts data to import. .
A convenient way to create CSV files is to use a Microsoft Excel or Google Spreadsheets, and then use “Save as CSV”. This will create the correct formatted file with the .csv file extension.
Field names are:
- First Name
- Last Name
- Account Name
- EmailAddress1
- EmailAddress2
- EmailAddress3
- EmailAddress4
- EmailAddress5
- Phone1
- Phone2
- Phone3
- Phone4
- Phone5
- Phone1Label
- Phone2Label
- Phone3Label
- Phone4Label
- Phone5Label
- AddressLine1
- AddressLine2
- AddressLine3
- City
- State
- ZIP
- Country
- Status
Supported values:
For Inactive status: inactive, not active, no, N, false, negative.
For Active status: Active OR just empty value
Important to know:
- Not all columns need to appear in the file. You can simply leave a field empty in the datasheet (it will show a comma in the CSV).
- You can include all columns or only a few for example, you can include only First Name, Last Name, EmailAddress1 and EmailAddress2 out of possible 5 email addresses.
- First Name and Last Name are required columns in each file.
- Email addresses are unique per contact, so if an email address in the file already exists, the contact (row) will be skipped and will not be imported.
- The file size must not exceed 3MB.
- The daily import limit is 15,000 contacts per day. This is also the rows limit per file.
When importing a large number of contacts, it is recommended to split your input files. For example, if you have a total of 12,000 contacts to import, you should probably split it into 3 smaller files (4000 contacts in each file) and import them, one file at a time, check the results and only then move on to the next file.
Example
Below is an example of a CSV file that can be imported:- Spreadsheet file:
- Plain text .csv file:
First Name,Last Name,Account Name,EmailAddress1,EmailAddress2,State

John,Doe,My company,JD@mydomain.com,JDhome@mydomain.com,NJ

Dana,Dean,,DN@mydomain.com,CA
Who can import?
Workspace Administrator and Power Users, that have access rights to accounts and contacts.
Check out Privileges for further information about required privileges and access rights required in order to import.
Import your contacts
- To import contacts you have to be a workspace administrator or a power user.
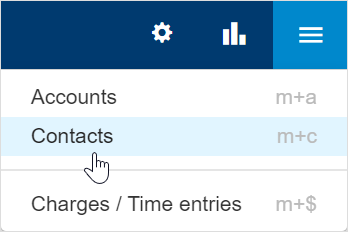
- Click the Three-lined (‘Hamburger’) icon and select Contacts to open the contacts view.
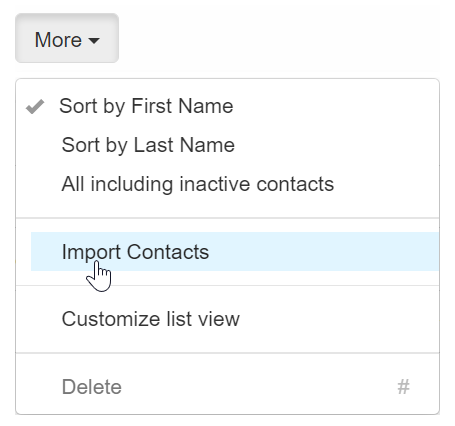
- Click the More menu in the contacts toolbar and choose Import Contacts to open the import window.
- Choose the import source: Outlook, Google or Custom (a file you prepare yourself).
- Click Browse to select the .csv file you want to import. If the file is found and loaded, you’ll see a confirmation in green text.
- Click Import to start importing your file.
- Once the email message is received, you should revisit the Contacts list to see the updates.
The import is performed in the background after you hit Import. When the import completes, a message with a summary of the import will be sent to you by email. The app will send the email to your primary email address that is defined in your Replypad profile.
Troubleshooting
Once the import is complete, an email message is received with an import report. In cases where not all rows have been imported, the message will include an explanation of the reason why the row was skipped. Below is a list of messages you might see in the report.If you encounter a failure to import a row, please check the following:
Message: Email address is not valid or not properly formatted(@.).
How to fix: An email address of a specific contact is not properly formatted. Find the row, fix the email address and reimport this line.
Message: No email address found for the record.
How to fix: Each contact must have at least one email address. Add the email address to the contact and reimport.
Message: Email address is already set for a user or contact.
How to fix: An email address that was provided in the file is already defined for a contact in the database. You cannot import existing email addresses.
Message: Invalid email address. Or no email address provided.
How to fix: Each imported contact must have at least one email address. Make sure you have provided email addresses for each row.
Message: ‘First Name’ or ‘Last Name’ column(s) not present in the CSV file.
How to fix: Make sure your columns include these fields, even if not all rows have values for them, they must be included in the import file.
Message: File type not in CSV format.
How to fix: Make sure you have the first row with field names, comma delimited, and that all the required fields are included in the columns headings.
Message: Maximum rows 15,000.
How to fix: The maximum for import is 15,000 rows per file (not including the header).You can always split large .csv files into smaller ones. You can also contact us to increase your daily import limits