What are custom fields?
Custom fields in Replypad allow you to keep additional information about:
- Customers (Contacts and Accounts)
- Users
- Tickets
- Assets
- Contracts
Important notes:
- Only administrators can add and manage custom fields.
- Custom fields related to ticket appear in the ticket’s sidebar.
- Custom fields related to Users, Accounts, Contacts, Assets and Contracts appear in their details.
- Account and Contact fields are considered Customer information and also appear in the ticket’s sidebar.
In this article, we will review how to create custom fields, delete them, and enter the information you want to track.
Why use custom fields?
Replypad comes with default fields that let you enter the core details about every user, contact and account you add to Replypad, as well as tickets, assets and contracts. When you need to track additional information, such as industry-specific fields or fields specific to your workflow, that’s where custom fields come in.
Usage examples
Custom fields are great for keeping information specific to your workflows or industry-specific details about your customers, tickets, assets and contracts.
Here are some examples:
- Customer local timezone.
- Contact’s birthday.
- Accounts subscription plan.
- The date they became a customer.
- Account industry-specific ID in a third-party software.
- Important notes to know when servicing the customer.
- Links to third-party websites with customer-specific parameters related to the contact/account.
Create custom fields
Workspace administrators can create custom fields and manage the settings for existing ones.
To create custom fields:
- Click the Gear icon in the navigation bar and select Custom fields in the menu.
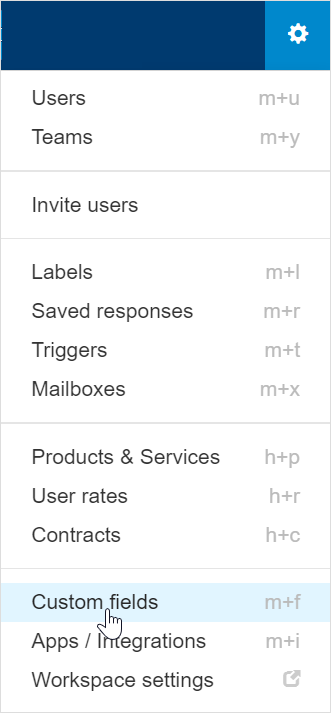
- Select either the Ticket Fields, Contact Fields, Account Fields, User Fields, Asset Fields or Contract Fields tab, depending on the entity you’d like to manage custom fields for.
- Click the New Custom Field from the toolbar.
- Enter details:
- Label – the label is the field’s name and should have a clear meaning that explains what this field is used for. The field label must be unique in your workspace.
- Key – the key is the field’s unique identifier that can be used in places like advanced search. The key must be unique in your workspace, and can contain letter from a-z, numbers, hyphens and underscores. For example: “crm_id”.
- Type – select the type from the drop-down:
- Text: A single line of text, up to 255 characters.
- Date: Date selection.
- URL: A valid Web address. Make sure the path starts with a valid path, such as “http://” or “https://”.
- Click Save to add the new field.
- Once created the new field will be displayed at the bottom of the list. Use the arrows on the right to reorder it.
View custom fields
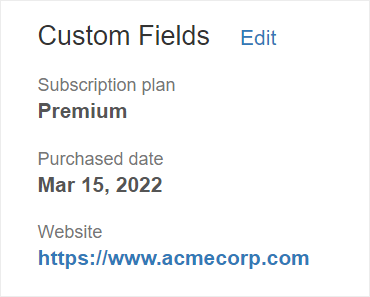
Replypad displays the custom fields in the following places:- In the Custom Fields section of Accounts.
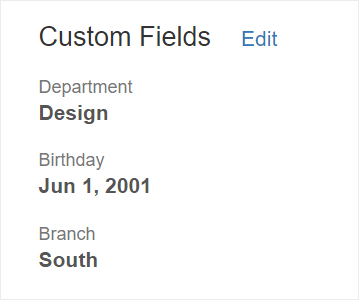
- In the Custom Fields section of Contacts.
- In the Custom Fields section of Users.
- In the Ticket’s sidebar within the ticket’s details.
- In the Accounts list view, Contacts list view, and Users list view.
- In the Custom Fields section of Assets.
- In the Custom Fields section of Contracts.
Delete custom fields
Workspace administrators can delete custom fields.
Note that after deleting custom fields you no longer have access to them or their data. Deleting is immediate and irreversible, so you should be cautious when deleting a field.
To delete a custom field:
- Click the Gear icon in the navigation bar and select Custom fields in the menu.
- Select the Ticket Fields, Contact Fields, Account Fields, User Fields, Asset Fields or Contract Fields tab, depending on which type of entity you’d like to delete the custom field for.
- Select the field you want to delete from the list using the checkbox on the left.
- Click More, then Delete.
- A confirmation window will notify you that deleting the custom field will remove it permanently. If you want to delete this field and all of its data, click Delete Now to confirm.
Rename custom field
Workspace Administrators can manage custom field settings. Note that you cannot change the field type. If you want a different field type, create a new one.
To edit a custom field’s label:
- Click the Gear icon in the navigation bar and select Custom fields in the menu.
- Select the Ticket Fields, Contact Fields, Account Fields, User Fields, Asset Fields or Contract Fields tab, depending on which type of entity you’d like to rename the custom field for.
- Click the field you want to edit.
- Edit the field’s Label, and click Save.
Search by custom fields
You can search by the custom fields you created, when viewing the tickets, contacts, users, accounts, assets or contracts lists.
This way you can filter the list according to the values you enter in these fields. For example, you may search for customers that have a birthday this month.
To search by custom fields:
- Open the Tickets, Accounts, Contacts, Users, Assets or Contracts list.
- In the Search box on the top toolbar, click the Search options icon.
- Under Search by custom fields or Search by additional fields, choose the custom field to search by, and set the condition and value.
- Click Search.
- The list will show only results that fit your search.
Edit custom fields values
From the entity’s details window (Account, Contact, User, Asset or Contract)
- Open the details of the Contact, Account, User , Asset or Contract for which you want to edit the fields.
- Scroll down to the Custom Fields section.
- Click Edit next to the Custom Fields label.
- Edit the fields in the window that opens. Field type can be one of the following:
- Text: A single line of text, up to 255 characters.
- Date: Date selection.
- URL: A valid Web address. Make sure the path starts with a valid path, such as “http://” or “https://”.
- Click Save to save your changes.
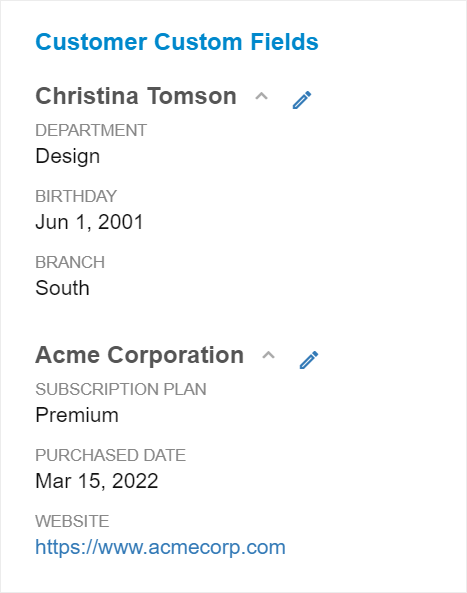
From the ticket’s sidebar (Ticket, Account and Contact fields)
- Open the ticket details page.
- Click Custom Fields or Customer Custom Fields from the sidebar.
- If you do not see the Custom fields in the sidebar, you may need to install it first. See the Ticket Custom fields app for more details.
- If you do not see the Customer Custom Fields, you may need to install it first. See the Customer Custom fields app for more details.
- Click the Pencil icon next to the Contact or Account you want to edit the details for.
- Edit the fields in the window that opens. Field type can be one of the following:
- Text: A single line of text, up to 255 characters.
- Date: Date selection.
- URL: A valid Web address. Make sure the path starts with a valid path, such as “http://” or “https://”.
- Click Save to save your changes.
Custom Fields Apps
The Custom Fields app is an add-on that allows you to show custom fields in the ticket’s sidebar, so you can edit the values and see values directly where you need them.
These add-on apps are usually automatically enabled by default, however, if you do not see the custom fields in the ticket’s sidebar, this may mean you need to enable it manually. To do this, follow the links below.
To enable Custom fields apps:
- Replypad Ticket Custom Fields App add-on that displays all the custom fields defined for tickets.
- Replypad Customer Custom Fields App add-on displays all the Custom Fields defined for Contacts and Accounts directly in the ticket’s sidebar.