Pipedrive is a customer relationship management (CRM) tool you can use for your business, allowing you to manage customers’ data and access it directly from Replypad. Connecting Pipedrive with Replypad keeps your teams in sync!
Once connected, you and your team have full context on each customer you communicate within the context of the ticket in Replypad. In the ticket’s sidebar, you can view Pipedrive CRM details relevant to the contact you are using in the ticket.
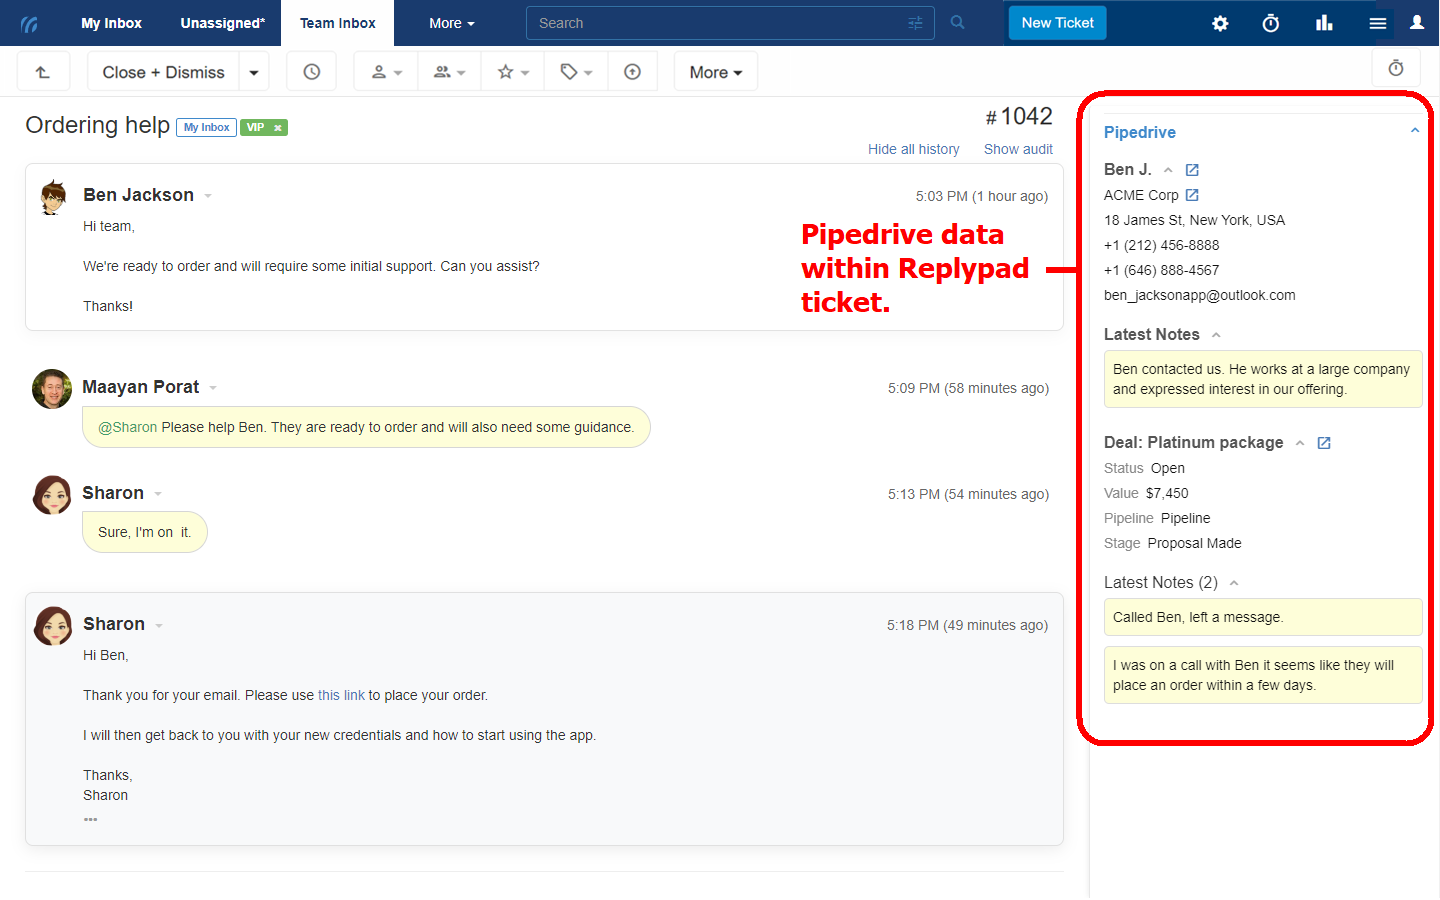
From the Pipedrive pane you can:
- View Pipedrive’s Contact details: Phone numbers, Address, Organization name, etc.
- View latest notes for this contact in Pipedrive
- View Deals linked to the Contact in Pipedrive
- Open Deal in Pipedrive: Opens the Deal details in Pipedrive in a separate tab.
- Open Contact details in Pipredrive: Open the Contact’s details in Pipedrive in a separate tab, where you can view all deals.
With the Replypad – Pipedrive integration, you will no longer need to switch tools or browser tabs endlessly.
Enable Pipedrive integration
To use the Pipedrive integration, a workspace administrator must first install the Pipedrive app in your workspace (see below).
Once installed, you need to enable the Pipedrive integration for yourself:
- Visit Settings > Apps / Integration and visit the Installed tab.
- Locate the Pipedrive installed app (if you cannot locate it, make sure your administrator has installed it and shared it with you).
- Click the Enable button.
- In the window that opens, click Proceed to get redirected to the Pipedrive website.
- You may be asked to log into Pipedrive.
- Pipedrive will display a page asking you to authorize Replypad.
- Click Allow and Install.
- Once approved, you will automatically return to Replypad, and the app will be ready for you to use.
Use the Pipedrive app in Replypad
To use the Pipedrive integration, a workspace administrator must first install the Pipedrive app in your workspace (see below) and you must enable the integration.
Once you’ve finished the ‘enable’ step, the integration is ready for use.
To use the integration:
- Visit an existing ticket or start composing a new one.
- The Pipedrive app appears in the ticket’s sidebar area.
- Click the Pipedrive app title on the sidebar to expand it.
- Pipedrive panel displays:
- All matching contacts: The app will search for one or more Pipedrive contacts with the same email address and will display all matching contacts with their details, latest notes and deals (see details below).
- Dealing with multiple matches: When there are multiple contacts that match this email address, the contacts you own in Pipedrive will show up first.
Details and actions include:
- General information: Phone numbers, Address, Organization name, etc.
- Latest notes:
- Replypad displays up to 10 notes per contact within the ticket.
- Clicking ‘…’ expands long notes.
- Deals:
- Replypad displays up to 10 deals per contact within the ticket.
- Deals are sorted by status (Open appear first) and date (within each status).
- Clicking the deal’s open in a new tab icon will open the deal in Pipedrive.
- Clicking See all deals will open the contact’s details in Pipredrive, where you can view all deals.
Disable the integration with Pipedrive
To disable the Pipedrive app for yourself, follow these steps:
- Open Settings > Apps / Integrations.
- Under the Installed tab, look for and select the Pipedrive app you want to disable.
- Click the Options button and select Disable.
Install Pipedrive integration
You need to be an administrator to manage and install apps and integrations.
- In Replypad, open Settings > Apps / Integrations.
- In the App Directory tab, look for the app to install and click it. The app will direct you to a page that displays additional information about this app.
- Click the Install button.
- You’ll be prompted to provide the name of this installed app. The name is how Replypad will refer to your app within your workspace. Name it or keep the default value and click Next.
- Choose which users will have access to and be able to use the Pipedrive integration within your workspace.
- When done, click Install.
- The installed Pipedrive app will show under the Installed tab.
And you’re done!