Asset details
To view your assets, you should have assets access rights.
- Click the Three-lined (‘Hamburger’) icon on the top-right corner and choose Assets.
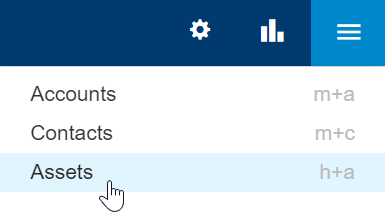
- This will display the list of assets.
- Click the asset you want to edit.
- Edit the settings as explained below.
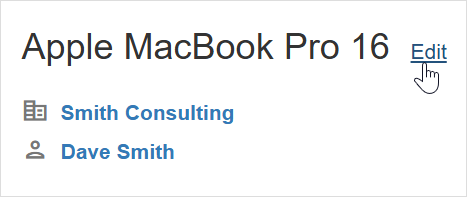
Name
The asset name is how the specific asset is referred and identified by.
Enter a clear asset name so you will be able to easily organize, track, and manage customers’ assets.
For example:
Lexmark printer – financial dept.
SSL Certificate – acme-company.com
Laptop for Dave Smith’s secretary
The asset name is displayed throughout the app where an asset is selected, e.g., a ticket’s asset.
To edit the asset’s name, hover over the name, and click the Edit link that appears.
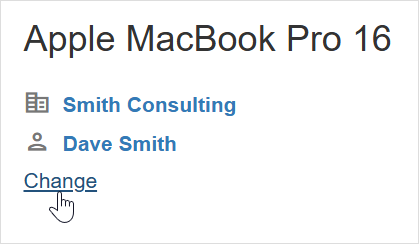
Account and Contact
The asset’s account is the organization that this asset is associated with, usually your customer.
The contact is a person this asset is associated with, , e.g., Joe’s laptop.
To change the account or link the asset to an account, click Change.
Billing Contract
Sometimes when providing service for specific assets, the work should be provided under a dedicated warranty or per-asset service contract, unlike under the customer’s standard service contract or billing agreement.
You can streamline this process by configuring a default billing contract for an asset.
Optionally select a billing contract that covers the asset. Click Change to select the contract.

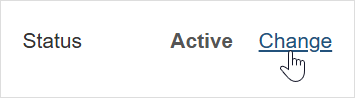
Status
An asset can be either active or inactive.
Only active assets can be associated with tickets.
To change the status of an asset:
- Hover over the status click the Change link that appears.
- Choose the desired status for the asset.
- Click Save to save your changes.
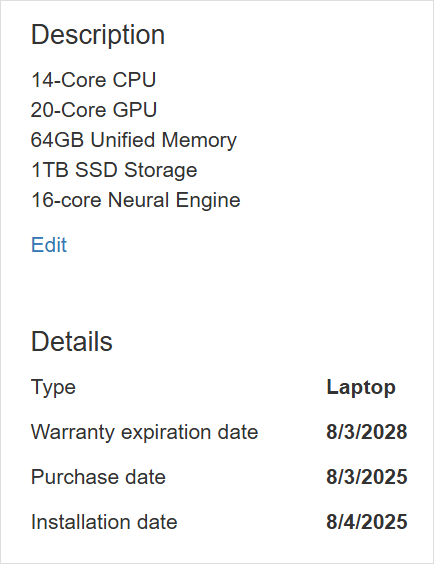
Additional details
You can manage additional information about each of your assets, including description, type, warranty expiration date, and purchase date.
Click Edit to add the details.
Service History
Click See associated ticket history to open a detailed view all tickets associated with this asset.

Custom Fields
Custom Fields are additional fields you can add and then manage to the different assets that you manage. It helps you customize the asset record structure beyond the different fields that come out-of-the-box, and tailor it to your specific business needs and workflow.
The Custom Fields section under the asset details page is where you see and manage the asset’s custom fields.
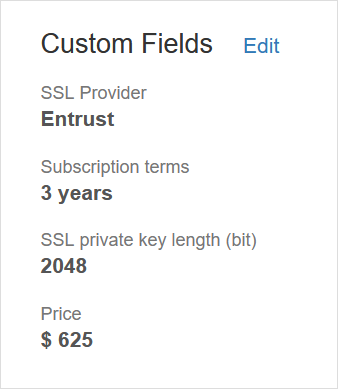
To learn how to edit custom fields see Edit Custom Fields values.
Documents
Here you can store and manage files related to the asset in one central place. You can upload and access documents that provide additional information about the asset, support maintenance activities, or help with troubleshooting.
For example:
- User manuals and product documentation
- Installation guides
- Warranty documents
- Configuration details
- License information
- Support or troubleshooting documents
Note: The maximum file size allowed is 25 MB per file.
To upload new files, click Upload to open the file selection dialog, or drag and drop files directly from your computer into the Documents section.
Default Label
Labels in Replypad let you add context and organize tickets better. Each label has a name and a color and are displayed with the ticket.
Choosing a default label will automatically assign the ticket with this label when this asset is selected for the ticket. This way you can mark tickets that have special meaning to you according to the asset.
To update the default label:
- Click Select (if there are no labels yet) or Manage to open the label selection window.
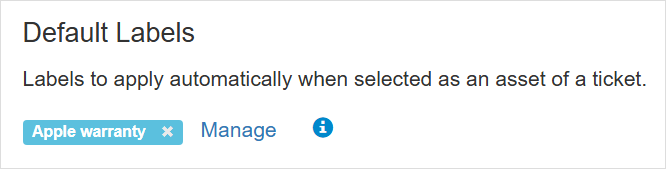
- Select the label you want to set as default for this asset.
- You can click Create new label if you need to use a label that does not exist yet, and create the new label.
- Click Save.