What are access rights?
Access rights in Replypad define which data or content users and contacts (customers) can or cannot access.
Workspace user (team members) access rights determine whether they can view the settings of accounts and contacts, and to which conversations they have access, according to the conversation’s Team.
User access to the Account and Contact lists
Administrators can determine which users will be able to access the Contact and Account lists and their settings (from the Three-lined (‘Hamburger’) icon.
To set up access rights to the lists:
- Click the Gear icon on the top-right corner and select Users from the popup menu.
- Click the user you want to update.
- Scroll down to Access Rights
- Hover over the value in Accounts & Contacts and click the Change link that appears.
- Select your option between:
- Yes – User has access to account and contact lists and may be able to manage them.
- No – User cannot see the account or contact lists, but can still work with their conversations.
- Click Save to save your changes.
Note that even when a user has access to the account and contact lists, they may be restricted from editing or deleting, due to insufficient privileges. In order to edit contacts and accounts the user needs to have Admin or Power user privileges.
User access to Conversation
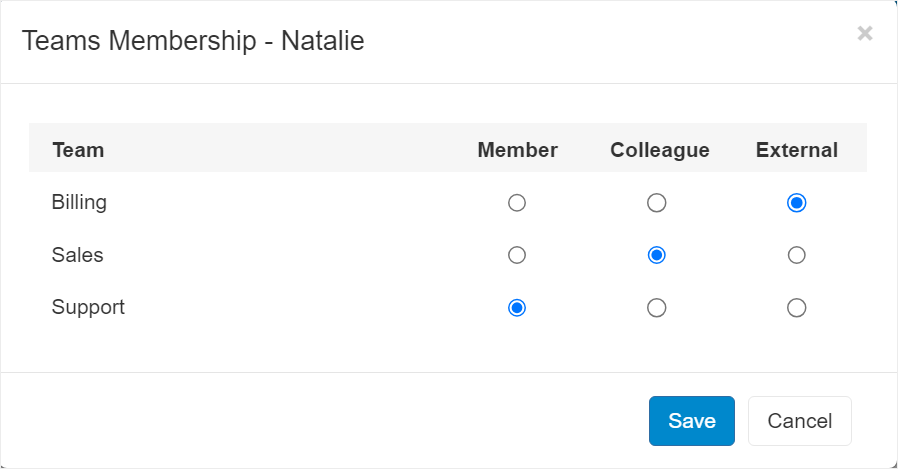
User’s access rights to conversations is determined by their Team memberships. Replypad offers three membership levels: Member, Colleague, and External.
You can restrict users from certain conversations by setting them as External to the conversation’s Team.
For example, restrict a user from seeing discussions about financial topics by setting them as External to the “Accounting” Team. Learn more about Team Memberships.
To set up access rights to conversations:
- Click the Gear icon in the top-right corner and select Users.
- Select the user you want to restrict, and scroll down to the Access Rights section.
- Hover over the Conversations and click the Change link that appears.
- The Teams Membership window will open.

- Select the user’s membership level for each Team:
- Select Member when the user is an active part of the Team.
- Select Colleague when the user should be able to see and collaborate about the Team’s conversations but is not part of the Team.
- Select External only when the user is uninvolved in the Team’s activities. They will not see the Team’s conversations unless someone explicitly adds them to a conversation.
Access rights for customers
Contacts (usually your customers) that have been defined in your workspace can login into Replypad and see their conversations. You can restrict their access to conversations in the account level and in the contact level.
Access rights in the Account level
Account access rights determine which conversation each contact that belongs to this account will see when they visit the workspace.
See the account access rights settings for setup instructions.
Access rights in the Contact level
The access rights per contact means which conversation will the specific contact be able to view when visiting the workspace in Replypad.
See the contact access rights settings for setup instructions.
User access to Billing and Financial options
When it comes to billing access, a user is assigned one of the following billing access rights levels:
All: Full access to everything related to billing, including charges, user rates, contracts, time entries, and invoicing. This level is assigned to all Admins and is also available as an option for Power Users.
Charges and time entries: Access to charges and time entries only.
Charges and time entries. No access to financial details: Access to charges and time entries without access to financial details.
Restricted: Time entries are allowed, charges are read-only, and no access to financial details.
No access: No access to billing, charges, financial details, or time entries.
To set up access rights to billing:
- Click the Gear icon in the top-right corner and select Users.
- Select the user you want to update, and scroll down to the Access Rights section.
- Hover over the Billing and click the Change link that appears.
- Select the settings from the options:
- All
- Charges and time entries.
- Charges and time entries. No access to financial details.
- Restricted. Time entries allowed, charges are read-only. No financial details.
- No access.
- Click Save to save your changes.
User access to Assets
To set up access rights to Assets:
- Click the Gear icon on the top-right corner and select Users from the popup menu.
- Click the user you want to update.
- Scroll down to Access Rights.
- Hover over the value in Assets and click the Change link that appears.
- Select your option between:
- Yes: User has access to the assets list and may be able to manage assets, subject to having sufficient privileges.
- No: User cannot see the assets list but can still view assets within conversation details.
- Click Save to save your changes