Introduction
Teams in Replypad allow you to manage groups of users and organize tickets effectively. This step-by-step guide will give you a high-level understanding of using teams in Replypad. You will learn about team membership levels, how Replypad determines the team for incoming tickets, how to identify the ticket’s team, and how to review the team’s performance.
Understanding teams in Replypad includes the following topics:
- Step 1: What are teams?
- Step 2: Team membership levels.
- Step 3: The ticket’s team.
- Step 4: Teams and mailboxes.
- Step 5: Accessing the ticket’s team.
- Step 6: Mention teams in notes and replies.
- Step 7: View tickets and reports by team.
Step 1: What are teams
Teams in Replypad represent groups of users working together on tickets. Teams can be company departments, ad-hoc project teams, or other defined groups.
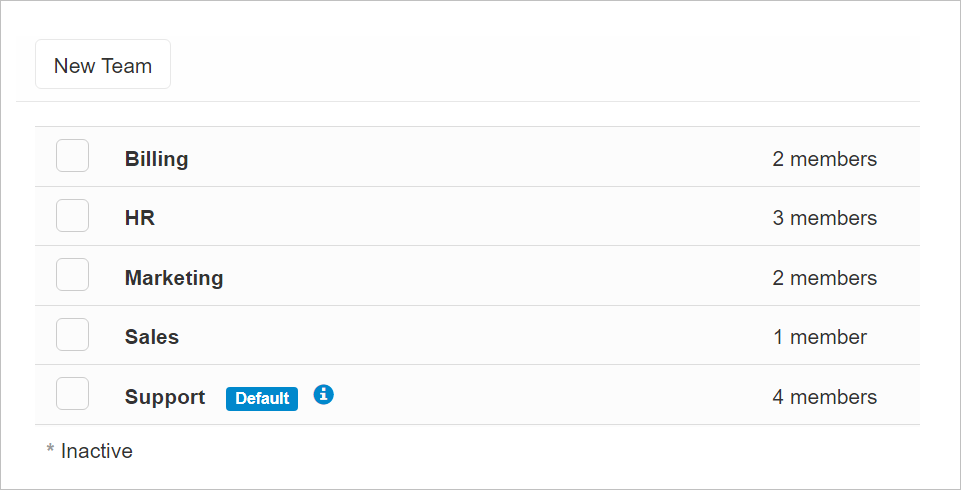
Examples of teams representing departments may include: Support, Sales, Marketing, HR, and Finance.
Other examples may include: Managers or Team Leads.
Examples of ad-hoc project teams: Deployment at Client X and Conference Prep Team.
Step 2: Team membership levels
Replypad offers three membership levels: Member, Colleague, and External.
- Members are responsible for actively handling the team’s tasks and have full access to the team’s tickets and resources.
- Colleagues can collaborate and view the team’s tickets but are not official team members.
- External users have minimal or no involvement in the team’s affairs. They do not have access to team tickets unless explicitly added to a ticket.
Teams and user memberships are defined and configured by administrators.
Step 3: The ticket’s team
Replypad automatically determines the team of an incoming ticket based on automated rules defined by the workspace administrator or according to default team settings in the mailbox and workspace level. The team can also be manually set or changed by users.
Replypad uses the following order of precedence when associating a ticket with a team:
- Automated trigger rule: If the automated rule applies to the ticket, it will set the ticket’s team.
- Mailbox default team: If no trigger rule applies, Replypad will use the Mailbox Default Team.
- Workspace default team: If no trigger rule applies and no Default Mailbox Team exists, it will use the Workspace Default Team.
Step 4: Teams and mailboxes
In Replypad, a team is not limited to a specific mailbox, which means you can associate an incoming message to the most appropriate team using flexible setting and rules.
This is how Replypad determines the team for an incoming ticket:
- Mailbox Default Team: A Mailbox may have a default designated team which automatically associates incoming tickets to this team.
- Automated Trigger Rules: Rules may override the Default Mailbox Team, for a more granular and flexible decision-making, as demonstrated in the use-cases below.
Using both a default team and automated rules allow for flexibility and accommodates different scenarios you may require in your business.
Example use-cases:
- Associate incoming support emails with the “Support Team”: Configure the “Default Mailbox Team” of the support@mycompany.com mailbox to the “Support Team”.
- Associate urgent email message with the “Priority Support” team: Define an automated rule that identifies urgent email messages (e.g., those containing the word “Urgent”) and set them to a dedicated “Priority Support” team. Automated rules override any default settings for the mailbox.
- Associate all incoming emails to the “Tier-1 Support” Team: Configure the “Default Mailbox Team” of all of these mailboxes to the “Tier-1 Support” team.
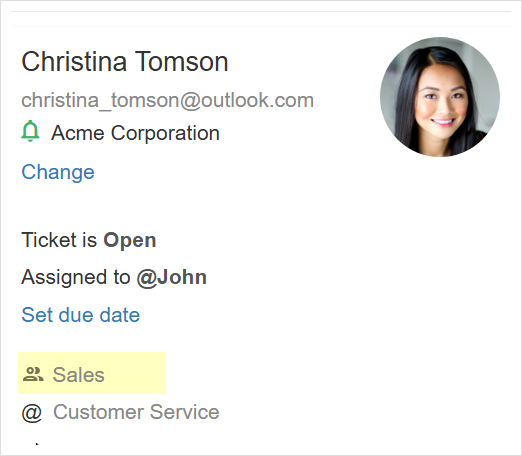
Step 5: Accessing the ticket’s team
You can view and update the ticket’s team from the list and the ticket’s details page.
Accessing the team from the ticket list:
- Viewing the teams:
- Display the ticket list (either from My Inbox, Team Inbox or any other view).
- The ticket’s team is displayed in the column on the right, below the ticket’s Assigned User (or the Unassigned label).
-
Updating multiple tickets at once:
- Select the tickets you want to update from the list.
- Select the desired team from the “Change Team” menu in the top toolbar or press the “y” key as a keyboard shortcut.

- The newly selected team should appear for all tickets chosen in the list.
Accessing the team from the ticket details page:
- Viewing the ticket’s team:
- Open the ticket details page.
- The ticket’s team is displayed next to the icon on the sidebar, below the Assigned User.
- Changing the ticket’s team:
- Open the ticket details page.
- Select the desired team from the top toolbar’s “Change Team” menu or press the ‘y’ key as a keyboard shortcut.
- The selected team will now be displayed in the sidebar next to the icon.
Step 6: Mention teams in notes and replies
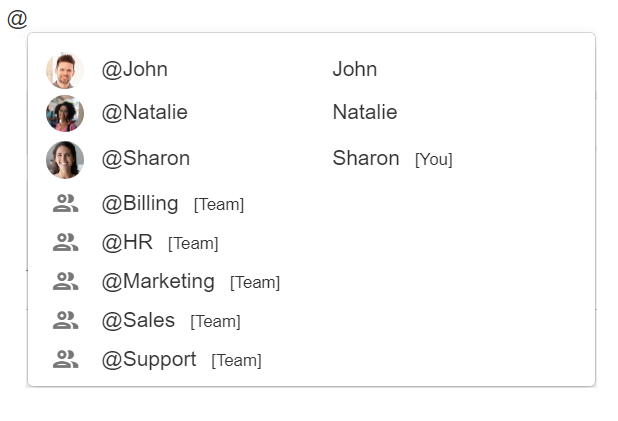
If you’d like to join someone in a ticket, you can mention them by typing the @ symbol, followed by their nickname, in the body of a message.
@Mentioning users will highlight their name in the message and automatically add them to the Followers or Cc recipients of the ticket, guaranteeing that Replypad will notify them about this message and any future correspondence in this ticket.
In the same way, you can mention a whole team by typing the team name after the @ symbol (Replypad offers you the available teams while typing). Mentioning a team will add each team member to the ticket as Followers. If you mention the team in a public reply, it will add all team members to the Cc recipients as well.
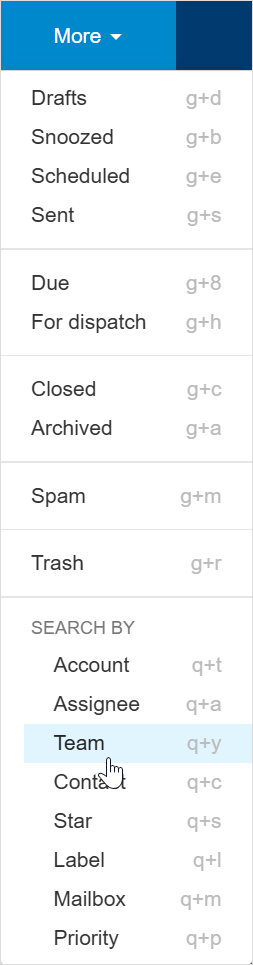
Step 7: Viewing tickets and reports by team
Viewing tickets by team allows you to get a quick overview of the current status of the team.
To view tickets by team:
- Click the More menu in the toolbar.
- Select By team or press ‘s’ followed by ‘y’ as a keyboard shortcut.
- Choose the team you want to view.
- Only tickets of the team you selected will display.
- To return to the regular view, switch to any other view, e.g., My Inbox.
To view ticket reports by team:
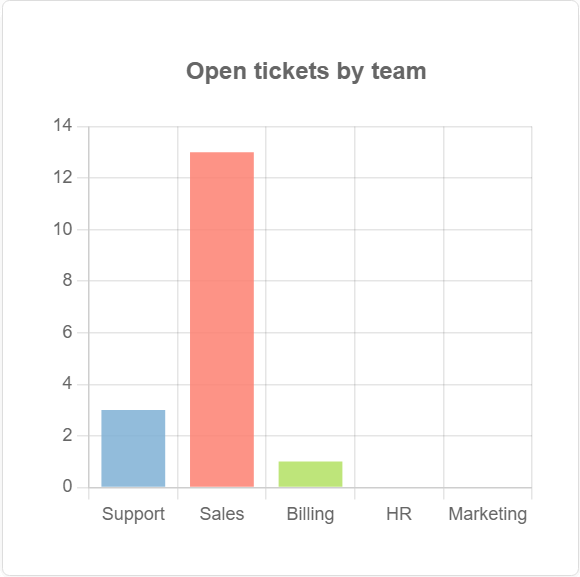
Reports allow you to view the real-time status of tickets and analyze key metrics over time. Viewing the ticket reports by team provides a clear picture of the activity, such as the number of tickets opened by the team, how many were closed by the team, and more.
- Click the Reports icon on the top toolbar.
- View reports by team, for instance: Open tickets by team.