How to create a ticket?
These are the ways to create tickets in Replypad:- From the New Ticket button in the top toolbar – see below.
- Automatically from incoming emails.
- Forwarding a ticket will create a new ticket.
- By a customer who enters the workspace in Replypad.
New ticket
- Click the New Ticket button in the top toolbar or hit c on your keyboard.
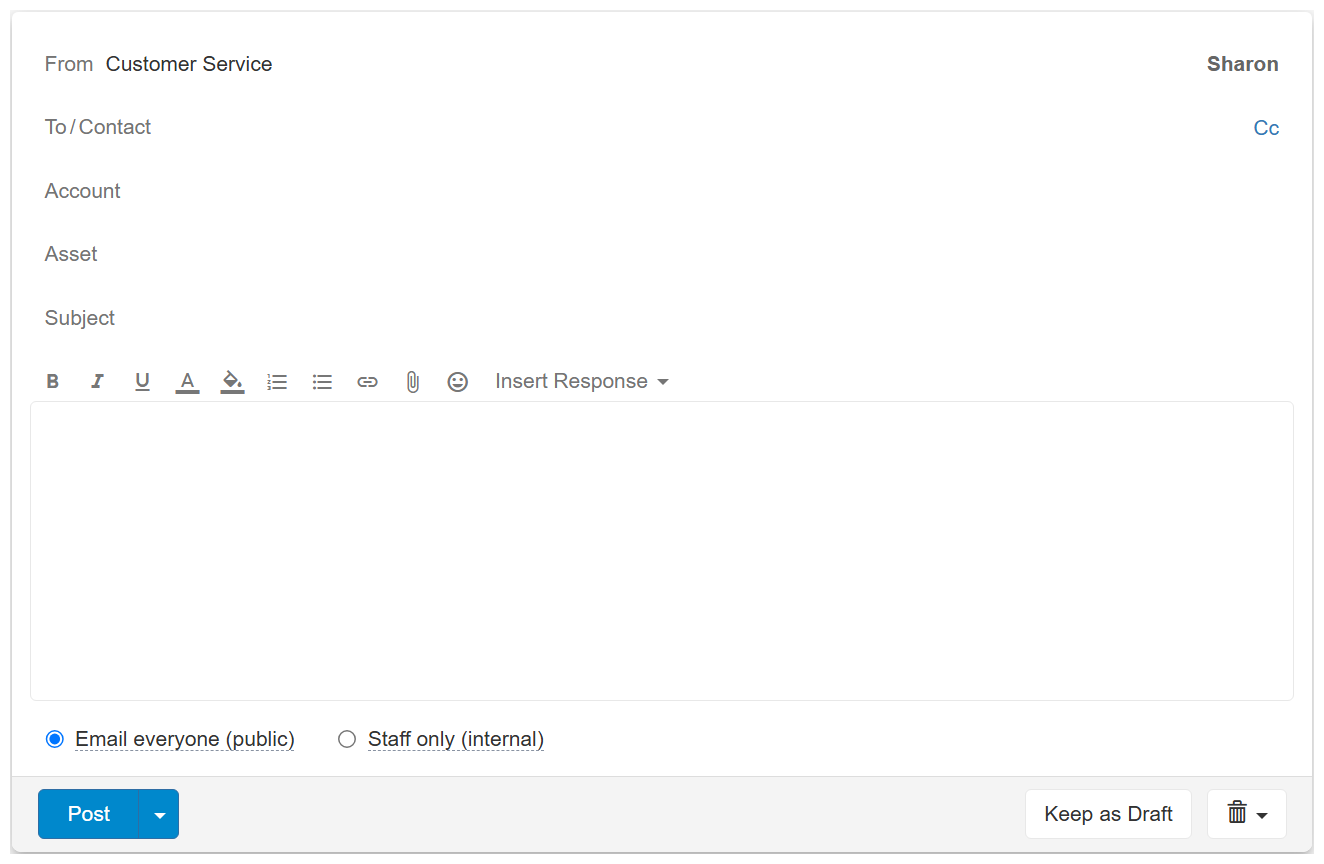
- The From at the top shows the mailbox that is selected by default for the ticket, and usually doesn’t need to change. If you do want to send the email from a different mailbox, click the mailbox name and select the mailbox you want to send the ticket from.
- Enter the To recipient: start typing the email address and choose a contact from the popup list. You can also type a new email address you have never used, automatically creating a new contact.
- Click Cc on the right to add more recipients: start typing the email address and choose a contact from the popup list. You can also type a new email address you have never used, automatically creating a new contact. Learn more about adding and managing Cc recipients.
- Click Account to associate the ticket with a specific customer Account. Note that if you selected a To-recipient contact that is linked to an Account, Replypad automatically links the ticket to this Account. Otherwise, you can select an Account from the list, or leave the Account empty.
- On the Followers section in the side pane, click Manage to add other Replypad users as followers: start typing the user name or nickname and choose a a user from the popup list.
- Type the Subject, which is the title for this ticket. It will become the email’s subject when sending email notifications.
- Type the ticket content. The email content can include text, inline images, links and attachments. You can use Saved Responses to save time while editing your response.
- Click the Post button or use the Ctrl + Enter keyboard shortcut to send the message right away. A count-down of three seconds appears, allowing you to cancel. If you want to send immediately simply click Send.
- Alternatively, if you do not wish to send yet, you can:
- Keep as Draft to save it as a draft and send it later or have someone else send it on your behalf. See Post someone else’s draft.
- Schedule the ticket to send later.

- When the ticket is created, an email notification is sent to each user added as a follower, and the ticket is added to the assignee and followers Replypad inbox. See details about email notifications below.
Click More, then Open draft ticket in a new tab to work on a separate page.
If the contact is linked to an Account, choosing the contact will automatically select the Account for this ticket.
You can attach files and images by pressing Alt then a or using the Attach icon in the toolbar. Images can also be added inline using copy-paste or drag & drop. Inline images are optimized so they won’t exceed the optimal size for sending and displaying in the app.
Advanced options when creating a new ticket
- Click the Assign icon (person icon on the toolbar) to assign the ticket to another Replypad user. By default when you create a ticket it is assigned to you, unless you select another user from the Assign pull-down menu.
- Select a Team from the top toolbar. By default the default team is automatically selected, and you can change the team from the toolbar.
- Select a Label from the top toolbar. By default the default labels are automatically selected, and you can change the labels from the toolbar.
- Set the ticket as a Priority ticket from the top toolbar.
- Start ticket with an Internal Note. Learn more about starting a ticket as an internal note.

New ticket notifications
New tickets trigger email notifications both to the customer and to Replypad users. Notifications are slightly different when you create the ticket from the application, and when Replypad automatically creates the ticket from an incoming email.
Following is a description of the email notifications per situation:
When a ticket is created by a user in Replypad:- Replypad sends an email notification to the customer listed as the To-contact, and Cc-recipients are Cc’d on the same email message.
- Replypad sends an email notification to the user assigned to this ticket, and to the followers.
- The ticket is pushed to their Replypad inbox.
- Replypad adds the email sender as the To-contact and other recipients Cc-contacts of the ticket.
- Replypad send an auto-response email notification letting them know that their email was received in Replypad.
More ways to create tickets in Replypad:
- Automatically from incoming emails.
- Forwarding a ticket will create a new ticket.
- By a customer who enters the workspace in Replypad.